You bring your timeline to a moment where the light should feel like late afternoon but the camera saw midday—flat, a little too honest. The clip is already cut, the edit locked, and now the frame needs a temperature shift and some density in the shadows that the built-in tools aren't quite shaping the way you want.
Choose your grading tools
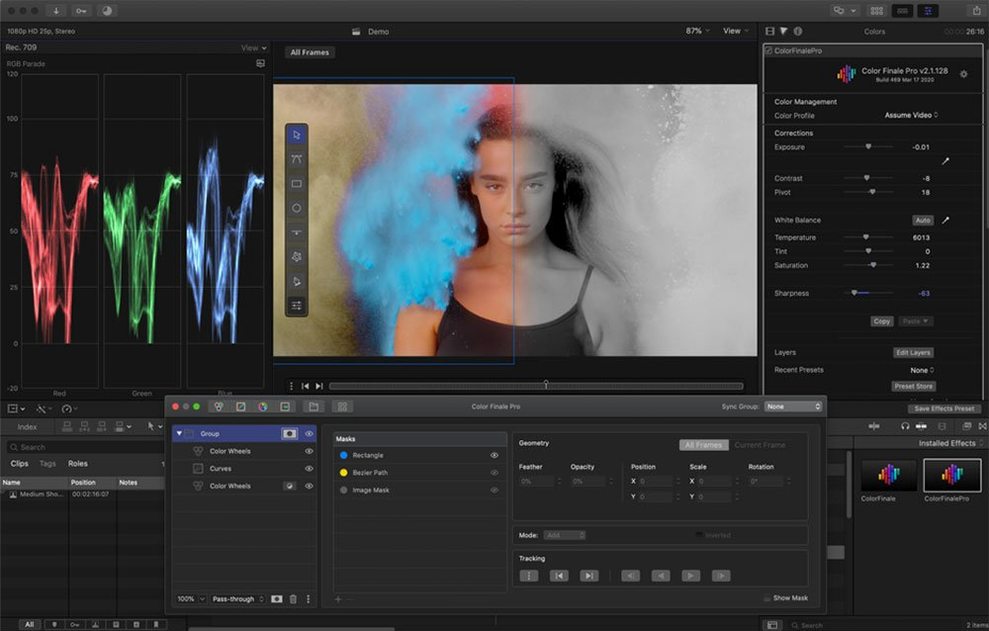
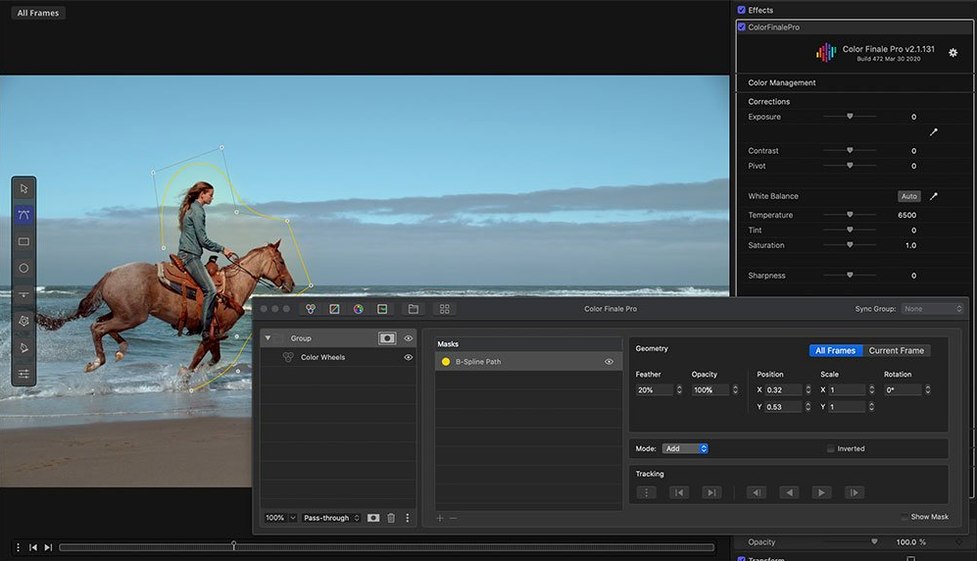
Color Finale places a dedicated colour-correction suite directly inside Final Cut Pro and Motion as a video effect plug-in, with color wheels, primary color vectors, and layered adjustments that let you build a grade piece by piece rather than wrestling with a single stack.
Build and save a look
Adjustments work in layers, so a contrast pass can sit beneath a subtle teal-and-orange shift without the two fighting. Finished looks can live in the Color Preset Store, and the bonus workflow for recreating looks helps translate a reference still into a starting point on your own footage.
Work inside your host
A separate Color Finale application manages the framework under macOS, while the plug-in itself appears inside Final Cut Pro 10.7 or newer and Motion, ready the moment you apply it to a clip.
Mistakes that flatten a grade before it starts
A surprising number of people open Color Finale, spin the lift wheel toward blue, and wonder why the whole image looks milky. The wheels aren't offset controls—they shift the entire tonal range unless you understand what each one governs. Lift moves the shadows, gamma pushes the midtones, gain adjusts highlights, and forgetting that hierarchy is the fastest route to a grade that feels thin. Another early habit is stacking layer upon layer of small tweaks until the scopes look right but the image has lost its texture. Color Finale's layered adjustments reward intention, not accumulation. A single well-placed curve often does more than three separate contrast layers.
Then there's the temptation to grade with the monitor uncalibrated, the room lights on full, or the macOS display profile set to something vivid. The plugin is precise—it will show you exactly what you asked for, even if your viewing conditions are lying to you. Beginners also tend to skip the vectorscope and rely purely on the viewer, which leads to skin tones drifting magenta or green without being noticed until the export is already running. And if you apply the effect to a compound clip instead of the individual clip underneath, any secondary correction you attempt will behave in ways that seem broken but are really just scoping the wrong image data.
Dock the scopes panel where your eyes already scan
Out of the box, Color Finale opens with a sensible default layout, but a few adjustments make the workspace feel more like yours. The first thing to do is enable the scopes panel and dock it where you can see waveforms and vectors without moving your head. Next, inside the preferences for the standalone application, switch the LUT interpolation to tetrahedral instead of trilinear—the difference is subtle on a single node but compounds noticeably when you stack LUTs inside a layer stack. Set your working color space to match the timeline rather than leaving it on automatic; a Rec. 709 project graded inside a P3 working space will shift on export in ways that are hard to trace later. Lastly, if you use a control surface, map the trackball sensitivity low enough that a quarter-turn is a deliberate choice, not a twitch.
When the effect layer is on but nothing shifts on screen
The most common headache is applying the effect and seeing nothing change. Nine times out of ten, the layer you added is sitting above the clip but its opacity or blend is set to bypass, or the viewer has slipped into an unrendered state that Final Cut Pro won't flag. Toggling the effect off and on inside the inspector forces a redraw. Another snag: a LUT you imported weeks ago suddenly appears with crushed blacks or clipped highlights. Color Finale's LUT Utility reads the cube file literally—if the LUT was authored expecting full-range data and your clip is video-range, the mismatch shows up immediately. The fix is to insert a levels adjustment after the LUT layer and remap the signal, or re-import the LUT with the correct range tag.
Performance stumbles on longer timelines are usually down to the render cache filling up. Quitting Final Cut Pro, deleting the render files for the project, and letting Color Finale rebuild them from scratch clears most stuttering. If the plugin window itself lags when dragging a curve point, check that the standalone Color Finale application is actually running—macOS sometimes quarantines it after an update and the plug-in falls back to a slower software path. Finally, if a grade renders with banding in smooth gradients like sky, add a tiny amount of noise as a top layer set to overlay at around two percent opacity. It's a film-lab trick that the digital pipeline sometimes needs reminding about.
Rescuing a stop-and-a-half underexposed dusk harbour shot
The clip is a wide shot of a harbour at dusk, underexposed by a stop and a half because the camera operator was protecting the sky. You open the project in Final Cut Pro, drop Color Finale onto the clip from the effects browser, and wait the half-second it takes for the interface to draw. The scopes confirm what your eyes already told you: the waveform is bunched in the lower third. You add a first layer, name it exposure base, and lift the gain wheel until the midtones hit around fifty percent on the waveform. The shadows come up with them, so you pull the lift wheel down gently to keep the blacks where they belong.
With the density restored, you add a second layer for colour. The water reads too cyan on the vectorscope, so you open the HSL curves and isolate the blue-cyan range, pulling it toward teal while keeping the saturation in check. A third layer gets a LUT from the Color Preset Store—one of the ASCEND presets that leans warm—and you dial its intensity back to forty percent so it seasons the image instead of cooking it. The sky, now properly exposed, shows a little banding near the horizon. You add a fourth layer with a slight blur masked to just that band, feather it wide, and the gradient smooths out. You save the whole stack as a preset called harbour dusk and apply it to the next three clips in the timeline with a single drag. The session took twelve minutes, and the export matches what you saw in the viewer.
Where Color Finale sits in a wider workflow
Color Finale isn't trying to replace a dedicated grading application—it's built to keep the grade inside the edit, which changes how you move between tools. A common chain starts in Final Cut Pro with Color Finale handling primary correction and look development, then a round-trip to Logic Pro for audio sweetening while the picture stays put. The plugin plays nicely with macOS's ColorSync framework, so if you've calibrated your display with a hardware puck and saved a profile, Color Finale respects that profile during playback. For editors who also touch Motion, the same grade layers you build in Final Cut Pro open inside Motion as effect parameters, which means a title animation and its underlying footage can share a single colour treatment without rendering intermediates.
The LUT Utility inside Color Finale also bridges the gap to other software. You can export a grade as a .cube file and drop it into OBS for a live stream, or load it onto a monitor LUT box for on-set previews. Some editors keep a folder of Color Finale presets synced through iCloud, so a look built on a desktop Mac appears on a laptop in another room without a drive swap. The plugin's support for Intel Macs means older machines still earn their keep—a 2015 iMac running macOS 10.12 can handle a three-layer grade in real time if the timeline is ProRes. And when the edit is locked, Color Finale renders directly into the Final Cut Pro timeline; there's no XML round-trip, no conform pass in another application. The grade is just another attribute of the clip, saved inside the library and ready to revise tomorrow.
- macOS 10.12 or later
- Intel Mac
- Final Cut Pro 10.7 or newer