The 4501 build brings a next-generation AI smoothing engine to the plugin, and that shift in how Portraiture reads skin texture is what makes it feel less like a separate tool and more like a native extension of your existing layer stack. It is still a dedicated portrait retouching plugin for Photoshop and Lightroom Classic, running on both Apple Silicon and Intel Macs from macOS 13 onward.
- Works inside Photoshop and Lightroom Classic, so adjustments land on a pixel layer or a smart filter you can fade, mask, or blend with the tools you already use.
- The new AI engine preserves pore structure and fine hair better at strong settings, which means fewer trips back to frequency separation for texture repair.
- Separate installer builds for the two host applications keep the plugin lightweight and responsive on ARM and x86 64-bit systems.
- Because it operates non-destructively on a duplicate layer by default, it slots into a retouching workflow alongside dodge and burn, curves, and colour grading without fighting them.
The interface stays in English, and the masking preview updates fast enough that you can check the skin selection on a zoomed-in section and adjust the threshold before committing. No new panels to learn—just a tool that behaves like it belongs in the dock of plugins you already keep open.
Softening a window-lit portrait from a fresh morning folder
It is half past nine and a folder of eighty headshots from yesterday's shoot sits on the desktop. Lightroom Classic opens to the first frame—a window-lit portrait with a little texture in the skin that the client will want softened but not erased. The raw file gets a gentle contrast curve and a white-balance tweak, then it is handed off to Photoshop with Edit In for the retouching pass.
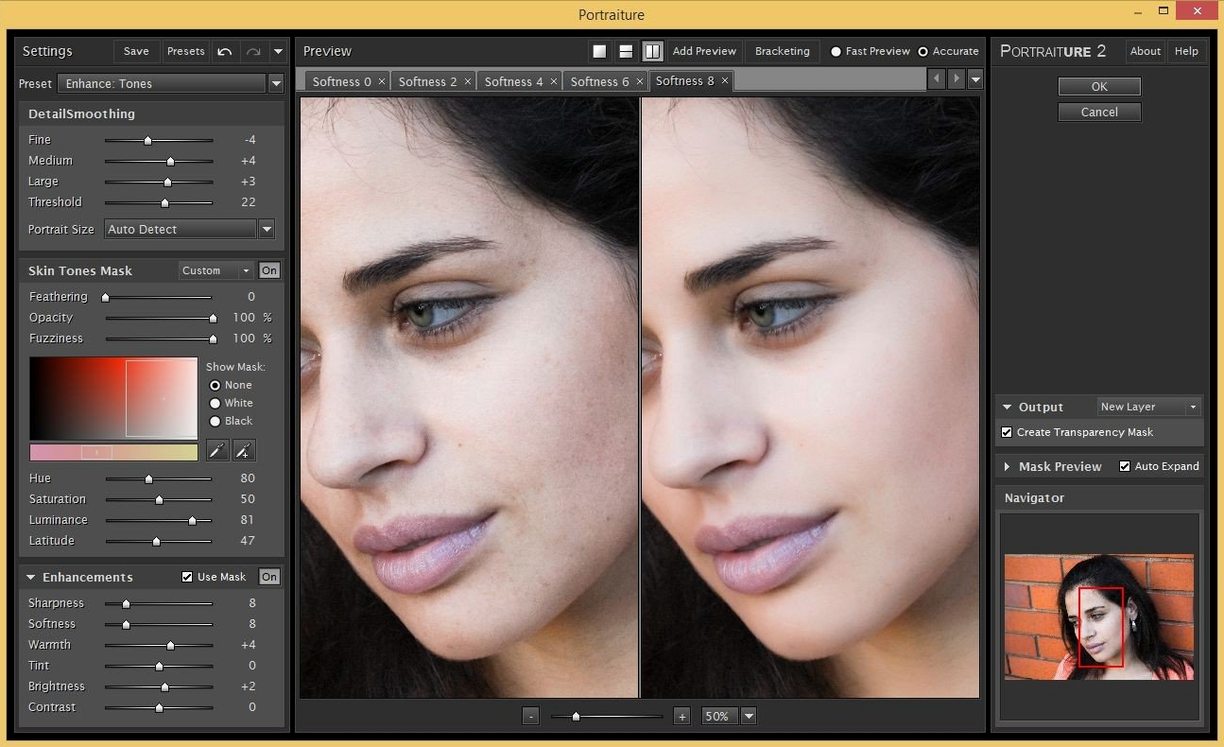
Inside Photoshop, the background layer is duplicated and renamed “retouch.” That layer is selected, and Portraiture is launched from the Filter menu. The plugin opens to its default preset, which almost never suits the image straight away, but the preview window updates in under a second on an M1 Pro machine, showing the mask as a grey matte over the skin areas it has detected.
The first adjustment is always the mask. The eyedropper tool inside Portraiture samples the subject's cheek, and the tolerance slider is pulled left until the mask excludes the eyebrows, the hairline, and the edge of the collar. A quick tap of the spacebar toggles between the before and after view—skin texture is visibly reduced, but the highlights on the bridge of the nose still hold their shape, and the fine hairs along the temple have not been smeared into a blur. That is the new AI engine at work, reading the difference between a pore and a stray strand of hair.
With the mask set, the smoothing strength is dialled to about forty percent. A stronger setting would push the image toward the plastic look that makes beginners reach for the undo shortcut, but at forty the effect is closer to what a skilled retoucher would spend fifteen minutes doing with a mix of frequency separation and the healing brush. A quick glance at the full-resolution preview at one hundred percent confirms that the catchlights in the eyes were never touched—Portraiture stayed inside its mask. The plugin is dismissed with OK, and the result lands on the “retouch” layer as a smart filter, fully fadeable and maskable.
The rest of the image gets a dodge-and-burn layer for the cheekbones and jawline, a slight vignette, and a colour grade. Because the skin work is on its own smart-filter layer, lowering the opacity to eighty-five percent brings back just enough natural texture that the portrait reads as untouched to anyone who does not know retouching. The file is saved and closed, and Lightroom picks up the next frame. By the time the coffee has cooled, twenty images are done.
Against the other tools in the drawer
Portraiture sits in a small group of plugins that promise fast, believable skin work, and each takes a slightly different route. Retouch4me Skin is the closest competitor in spirit—it also analyses the image and builds a mask automatically—but it arrives as a standalone application rather than a plugin, so the round trip between Lightroom and Photoshop gains an extra step. Its masking is often more conservative out of the box, which some retouchers prefer, but the lack of a live preview inside Photoshop means more back-and-forth tweaking. On images where strong backlight confuses the algorithm, Portraiture's manual mask-refinement tools give it an edge.
Adobe's own Neural Filters, bundled with recent versions of Photoshop, offer a Skin Smoothing option that requires no third-party installer and no separate download. It works fast and leans heavily on Adobe's cloud-trained models. The trade-off is control: the blur-and-blend approach inside Neural Filters can flatten pores on darker skin tones where Portraiture's AI engine preserves more micro-contrast. Neural Filters also cannot be fine-tuned with an internal mask editor—you accept the area Photoshop decides is skin, or you paint a layer mask afterward. That is fine for a quick proof, but on a paid job where the subject's freckles need to survive the edit, the extra masking step inside Portraiture pays for itself in minutes.
Then there is Frequency Separation actions and panels, the manual route that costs nothing beyond Photoshop itself. A well-built action splits the image into colour and texture layers, and the retoucher paints on each with the clone stamp and mixer brush. The results can be flawless, but a single portrait can take twenty minutes. Portraiture does not replace that workflow for every image—some shots still need the precision of a hand-painted texture layer—but for the seventy-five percent of frames in a session that need a gentle, consistent cleanup, it cuts the work to under a minute per image. The smart decision is knowing which tool fits which frame.
Duplicating the layer so smoothing never bakes into the original pixels
The most common beginner mistake is applying Portraiture to the background layer directly. It takes one accidental Save to bake the smoothing into the original pixels with no way back. The habit of duplicating the layer first, or converting it to a smart object before launching the filter, is worth building on day one. A smart filter also means you can double-click the Portraiture entry in the Layers panel a week later and adjust the settings without redoing the rest of the edit.
Another misstep is ignoring the mask preview. The default mask often creeps into the whites of the eyes and the edges of the lips, and if those areas are smoothed, the face loses its anchor points—the sharpness that tells the viewer they are looking at a person, not a rendering. Taking thirty seconds to brush those zones out of the mask, or to lower the mask's edge sensitivity, makes the difference between a retouch that looks professional and one that looks like a filter was slapped on.
Oversmoothing is the third trap. A new user sees the strength slider and pushes it to eighty or ninety percent, chasing a flawless look that reads as unnatural on any screen larger than a phone. The skin should still have luminance variation and a hint of texture when viewed at fifty percent zoom. A good rule of thumb: set the smoothing to where you think it looks right, then back it off ten points and check again in the morning.
Dragging the smoothing slider on an Apple Silicon Mac feels continuous
On an Apple Silicon Mac with 16 GB of unified memory, Portraiture 4.5 processes a twenty-four-megapixel raw file inside Photoshop in roughly one to two seconds. The preview updates are fast enough that dragging the smoothing slider feels continuous rather than stepped, and the mask-rendering overlay does not stutter when panning across the image at one hundred percent. On an older Intel machine running macOS 13, the wait stretches to three or four seconds per adjustment, still workable but enough to notice if you are moving through hundreds of frames in a sitting.
Memory use is modest for a plugin that works at full resolution. Photoshop's activity monitor shows a brief spike of a few hundred megabytes during processing, which settles back once the filter commits. The plugin does not run a background service or a helper daemon—it wakes when called and releases its hold afterward. That matters during long editing sessions where the system is already juggling large PSDs, a browser full of reference images, and a music stream. Portraiture has not caused a beachball or a crash in several weeks of daily use on the current build, and the TNT release has proven stable across both Photoshop 2024 and Lightroom Classic 13.
The separate installer builds for Photoshop and Lightroom Classic are a quiet stability win. Each host gets a version of the plugin compiled against its own SDK, which avoids the compatibility roulette that plagues single-installer plugins when one host updates its plugin architecture. If Adobe ships a Lightroom point release that breaks third-party filters, the Photoshop build often keeps working while a fix arrives.
How it weaves into the rest of the Mac studio
Portraiture sits inside Adobe's ecosystem during active use, but its output flows outward. A retouched PSD saved with smart filters intact can be opened later in Affinity Photo, which reads the embedded layers and keeps the smoothing editable. That matters for photographers who prefer Affinity's raw development but still want Photoshop's plugin library for the retouching pass. The TNT release's Gatekeeper-friendly installer also means the plugin survives macOS point updates without being quarantined, a small but real friction point with unsigned software.
Outside the Adobe orbit, the finished portraits often land in Apple Photos via a shared album for client review, and the subtle skin work that Portraiture produces holds up on the colour-managed displays of newer MacBook Pros. The plugin does not interact with Shortcuts or Automator directly, but a well-named droplet action tied to a folder of processed PSDs can batch-export JPEGs for proofing with no extra intervention. And because the retouching layer is always separate in the file, a client request to “dial back the skin work just a touch” is a ten-second opacity change rather than a do-over.
For those searching out imagenomic portraiture download options or a working portraiture 4 crack for the current version, the 4501 build is what you will find on this site, and it plays well with the rest of a modern Mac studio. The plugin does not demand a dedicated scratch disk, a fast external SSD, or a particular GPU—it uses the same resources Photoshop already claims and gets out of the way when the work is done.
Build 4501 introduces a next-generation AI smoothing engine that refines how the plugin reads and preserves skin texture across the frame.
- macOS 13 or later
- Apple Silicon or Intel Mac
- Adobe Photoshop or Lightroom Classic
- Interface language: English
Questions from the booth
Yes, it supports both ARM and x86 64-bit systems, so it runs natively on Apple Silicon as well as Intel-based Macs.
Imagenomic provides separate downloads for Photoshop and Lightroom Classic, and the plugin is compatible with both applications.
The plugin requires macOS 13 or later, with official compatibility listed for macOS 13 and above.